
使用 Docker-compose 部署最新版 OpenClaw(企业部署方案)
前言
在企业对私有部署、数据安全与自动化 AI 能力需求日益增长的背景下,OpenClaw 凭借开源可控、功能强大的优势成为企业级智能体落地的热门选择。使用 Docker-compose 进行部署,可实现环境标准化、服务一键编排与快速运维,大幅降低企业上线成本。本文将基于最新版 OpenClaw,提供一套简洁高效、可直接用于生产环境的 Docker-compose 企业部署方案。
1. 创建基本工作目录
mkdir -p ~/openclaw/nginx/{conf,cert}
cd ~/openclaw
2. 获取 OpenClaw 初始化配置文件
docker run -itd --name openclaw-temp ghcr.io/openclaw/openclaw:latest
docker cp openclaw-temp:/home/node/.openclaw ./
chmod 777 -R .openclaw/
docker stop openclaw-temp
docker rm openclaw-temp
3. 配置HTTPS,访问 OpenClaw UI 要求使用https
3.1 自签https证书
cd ~/openclaw/nginx/cert
openssl req -x509 -newkey rsa:2048 -keyout example.key -out example.crt -days 365 -nodes -subj "/CN=example.com"
3.2 创建 Nginx 配置
cd ~/openclaw/nginx/conf
vim nginx.conf
worker_processes  1;
pid        /var/run/nginx.pid;
events {
  worker_connections  1024;
}
http {
  include       mime.types;
  default_type  application/octet-stream;
  sendfile        on;
  keepalive_timeout  65;
  # 设置上传文件的最大值
  client_max_body_size 1024m;
  server_tokens off;

  server {
    listen 443 http2 ssl;
    server_name localhost;

    ssl_certificate      /etc/nginx/cert/example.crt;
    ssl_certificate_key  /etc/nginx/cert/example.key;
    ssl_session_cache    shared:SSL:1m;
    ssl_session_timeout  5m;
    ssl_protocols TLSv1 TLSv1.1 TLSv1.2;
    ssl_prefer_server_ciphers on;
    ssl_ciphers ECDHE-ECDSA-AES128-GCM-SHA256:ECDHE-RSA-AES128-GCM-SHA256:ECDHE-ECDSA-AES256-GCM-SHA384:ECDHE-RSA-AES256-GCM-SHA384:ECDHE-ECDSA-CHACHA20-POLY1305:ECDHE-RSA-CHACHA20-POLY1305:DHE-RSA-AES128-GCM-SHA256:DHE-RSA-AES256-GCM-SHA384;

    add_header Strict-Transport-Security "max-age=31536000";


      location / {
        # 设置反向代理的地址(实际是请求转发)
        proxy_pass http://openclaw-gateway:18789;
        # 设置HTTP请求头
        proxy_http_version 1.1;
        proxy_set_header Upgrade $http_upgrade;
        proxy_set_header Connection "upgrade";
        proxy_set_header Host $host;
        proxy_set_header X-Nginx-Proxy true;
        proxy_set_header X-Forwarded-Proto $scheme;
        proxy_set_header X-Real-IP $remote_addr;
        proxy_set_header X-Forwarded-For $proxy_add_x_forwarded_for;

        # Timeouts for long-lived WebSocket connections
        proxy_connect_timeout 7d;
        proxy_send_timeout 7d;
        proxy_read_timeout 7d;

      }

      error_page 401 403;
      error_page   500 502 503 504  /50x.html;
      location = /50x.html {
          root   html;
      }
  }
}
4. 创建 docker-compose 文件
cd ~/openclaw
vim docker-compose.yaml
version: "3.8"
services:
  openclaw-gateway:
    image: ghcr.io/openclaw/openclaw:latest
    container_name: openclaw
    restart: unless-stopped
    volumes:
      - ./.openclaw:/home/node/.openclaw          # Config and data
    environment:
      - TZ=Asia/Shanghai     # Set your timezone
    mem_limit: 2g            # Prevent runaway memory usage
    logging:
      driver: json-file
      options:
        max-size: "10m"
        max-file: "3"
  openclaw-nginx:
    image: nginx:1.23.4
    container_name: openclaw-nginx
    restart: always
    ports:
      - 443:443
    volumes:
      - ./nginx/conf/nginx.conf:/etc/nginx/nginx.conf
      - ./nginx/cert:/etc/nginx/cert
    privileged: true
    depends_on:
      - openclaw-gateway
- 创建容器
docker-compose up -d
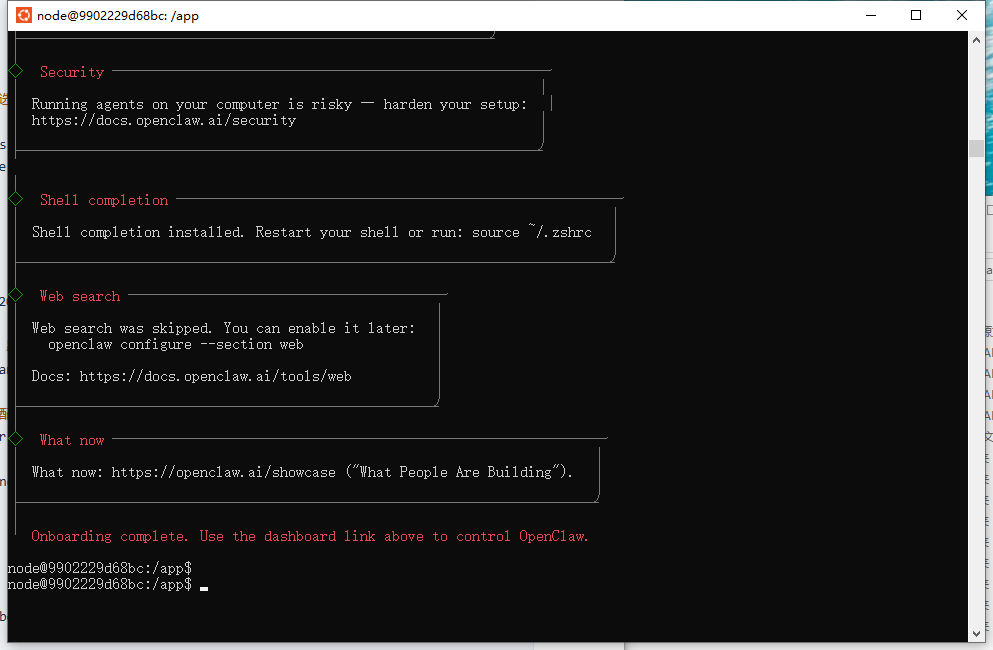
5. 运行一次生成初始配置
docker exec -it openclaw /bin/bash
openclaw onboard
◆  I understand this is personal-by-default and shared/multi-user use requires lock-down. Continue?
│  ● Yes
│
◆  Onboarding mode
│  ● QuickStart (Configure details later via openclaw configure.)
│
◆  Config handling
│  ● Use existing values
│
◆  Model/auth provider
│  ● Volcano Engine (API key)  # 选择自己的模型平台,这里可以随便选一个,后面再手动改配置文件
│
◆  How do you want to provide this API key?
│  ● Paste API key now (Stores the key directly in OpenClaw config)
│
◆  Enter Volcano Engine API key
│  123456
│
◆  Default model
│  ● volcengine/deepseek-v3-2-251201 (DeepSeek V3.2 · ctx 125k)
│
◆  Select channel (QuickStart)  # 跳过通讯工具配置
│  ● Skip for now (You can add channels later via `openclaw channels add`)
│
◆  Search provider  # 跳过联网工具配置
│  ● Skip for now (Configure later with openclaw configure --section web)
│
◆  Configure skills now? (recommended)   # 不安装skill
│  ○ Yes / ● No
│
◆  Enable hooks?
│  ◼ Skip for now  # 先空格再回车
│
◆  How do you want to hatch your bot?
│  ● Do this later
到这里,初始化配置就完成了,执行命令 exit退出容器
6. 修改openclaw.json,开放局域网访问
修改bind为"lan"访问,添加访问url白名单
vim ~/openclaw/.openclaw/openclaw.json
"gateway": {
    "port": 18789,
    "mode": "local",
    "bind": "lan",
    "controlUi": {
      "allowedOrigins": [
        "http://localhost:18789",
        "http://127.0.0.1:18789",
        "https://宿主机IP"
      ]
    },
    "auth": {
      "mode": "token",
      "token": "e5VidO5PiSxNCrZ31oWnCd0m1OHemVFtvGvl6J5w9YdOjlfoiofKPYYZzniwa16X"
    },
    "tailscale": {
      "mode": "off",
      "resetOnExit": false
    }
  }
- 重启 OpenClaw
docker-compose restart
7. 连接 OpenClaw UI
默认:https://宿主机IP
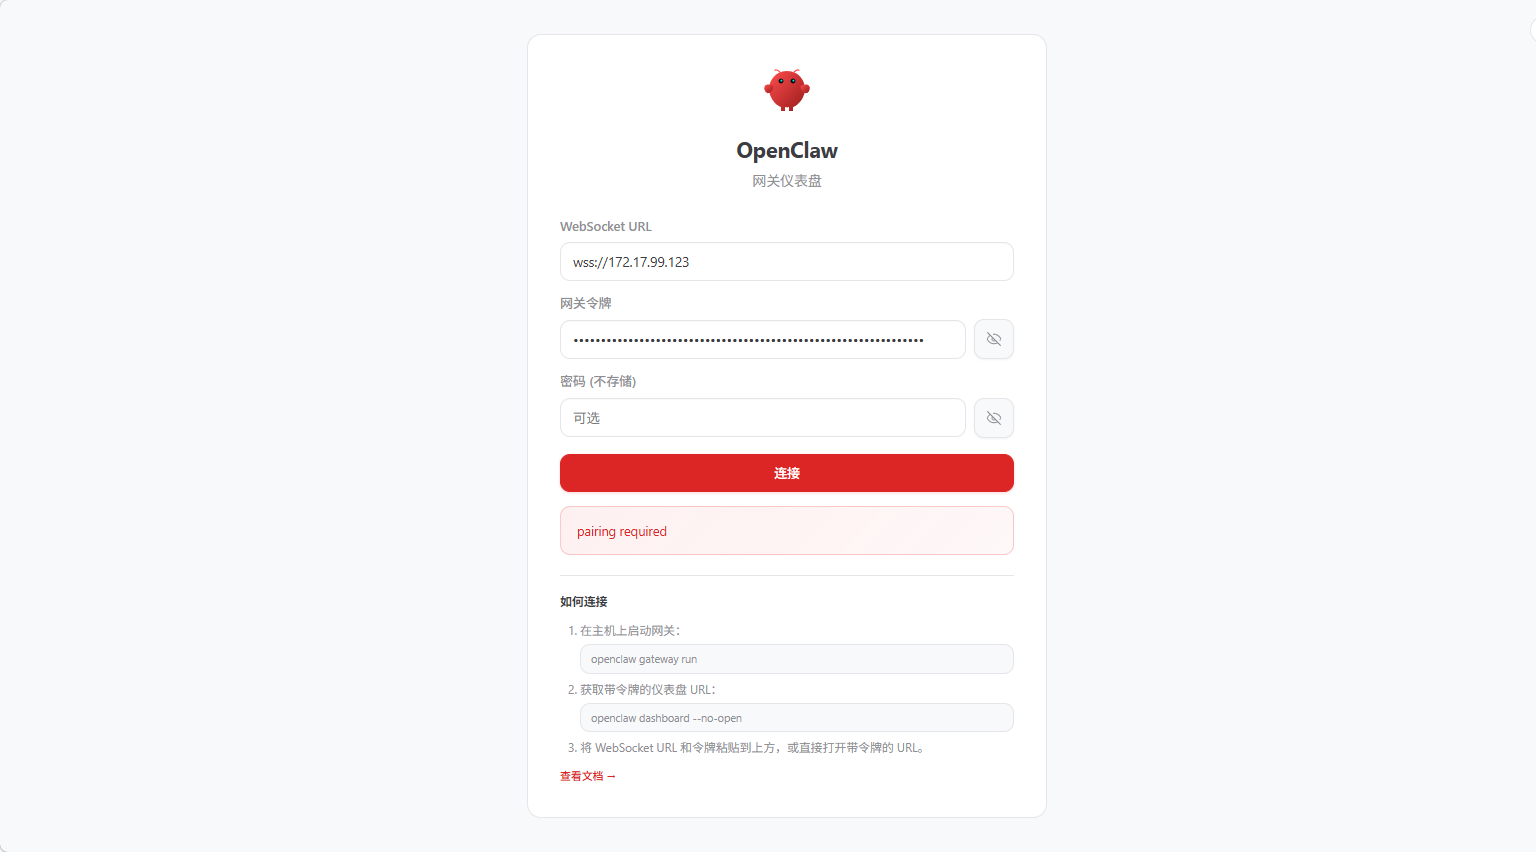
点击连接报错:pairing required
8. 给连接主机授权
docker exec -it openclaw /bin/bash
openclaw devices list
openclaw devices approve 8eadb326-b016-4dv3-8154-710c0c757487 # 刚刚查到的 Request ID
exit
添加完白名单再次点击连接就可以进来了

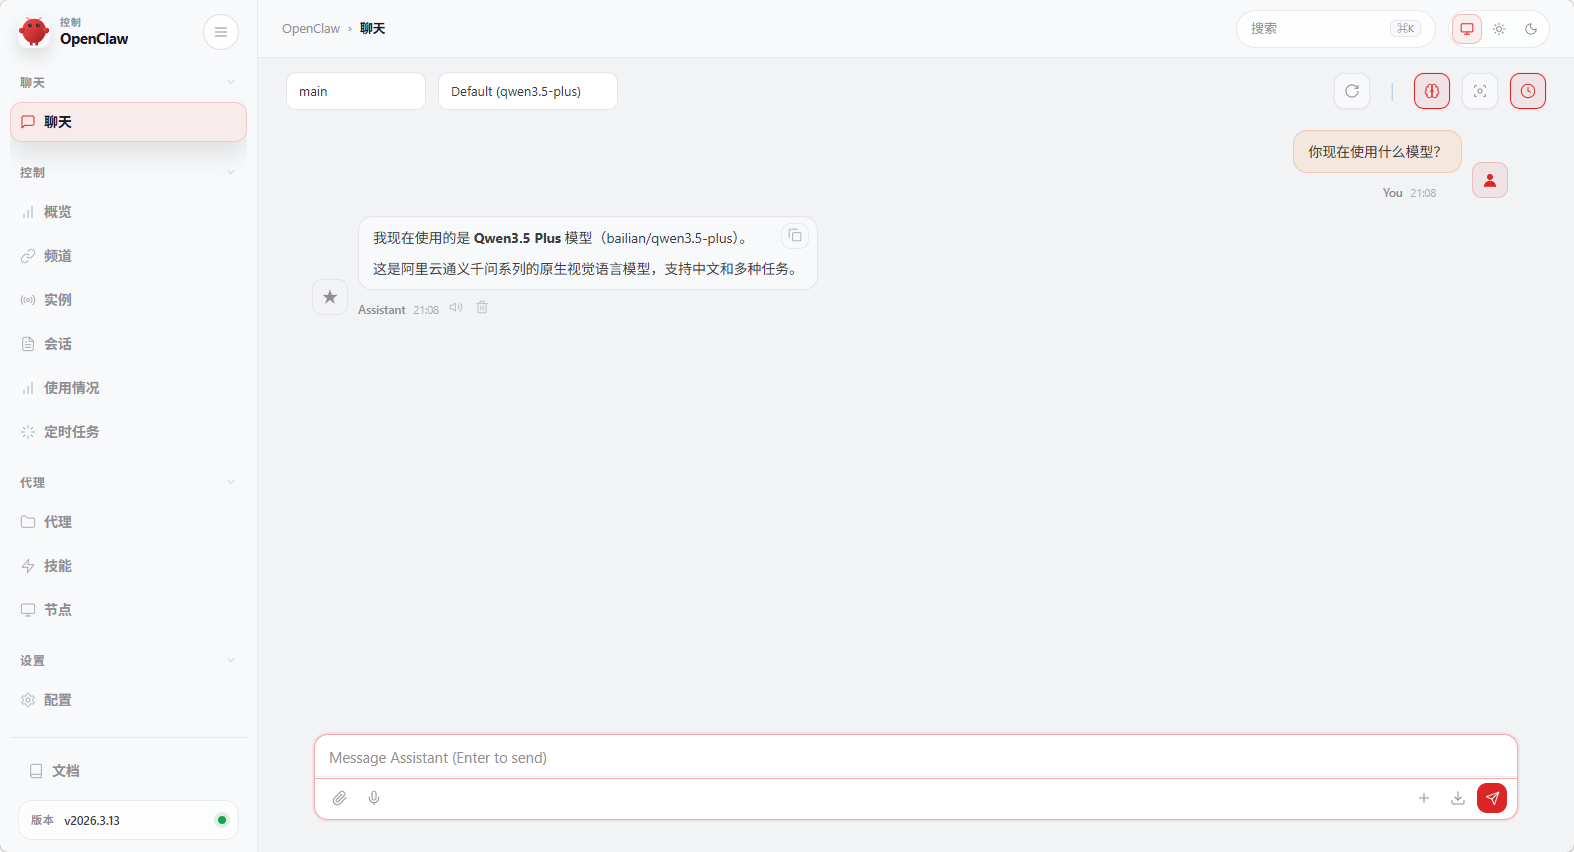
9. 添加大模型---阿里千问(性价比高)
vim ~/openclaw/.openclaw/openclaw.json
"models": {
    "mode": "merge",
    "providers": {
      "bailian": {
        "baseUrl": "https://dashscope.aliyuncs.com/compatible-mode/v1",
        "apiKey": "sk-643fd91937834126ab0177e066922d55",
        "api": "openai-completions",
        "models": [
          {
            "id": "qwen3.5-plus",
            "name": "通义千问 3.5 Plus",
            "reasoning": false,
            "input": ["text", "image"],
            "cost": {
              "input": 0.001,
              "output": 0.002,
              "cacheRead": 0,
              "cacheWrite": 0
            },
            "contextWindow": 128000,
            "maxTokens": 4096
          }
        ]
      }
    }
  },
  "agents": {
    "defaults": {
      "model": {
        "primary": "bailian/qwen3.5-plus"
      },
      "models": {
        "bailian/qwen3.5-plus": {
          "alias": "Qwen3.5原生视觉语言系列Plus模型"
        }
      },
      "compaction": {
        "mode": "safeguard"
      }
    }
  },
- 重启 OpenClaw
docker-compose restart
10. 测试 OpenClaw
版权声明:
本站所有文章除特别声明外,均采用 CC BY-NC-SA 4.0 许可协议。转载请注明来自
运维小记 | 专注运维技术分享!
喜欢就支持一下吧
&pics=/upload/file/downloaded-image.jpg&summary=)
&pics=/upload/file/downloaded-image.jpg&desc=)
打赏
 微信
微信
支付宝
 微信
微信
 支付宝
支付宝